How to Generate AI Model Photos for Your Clothing Brand
A practical, step-by-step guide to creating professional on-model catalog images using AI. No studio, no photographer, no booking required. This is the exact workflow Indian boutiques and manufacturers use to photograph entire catalogs in a single afternoon.
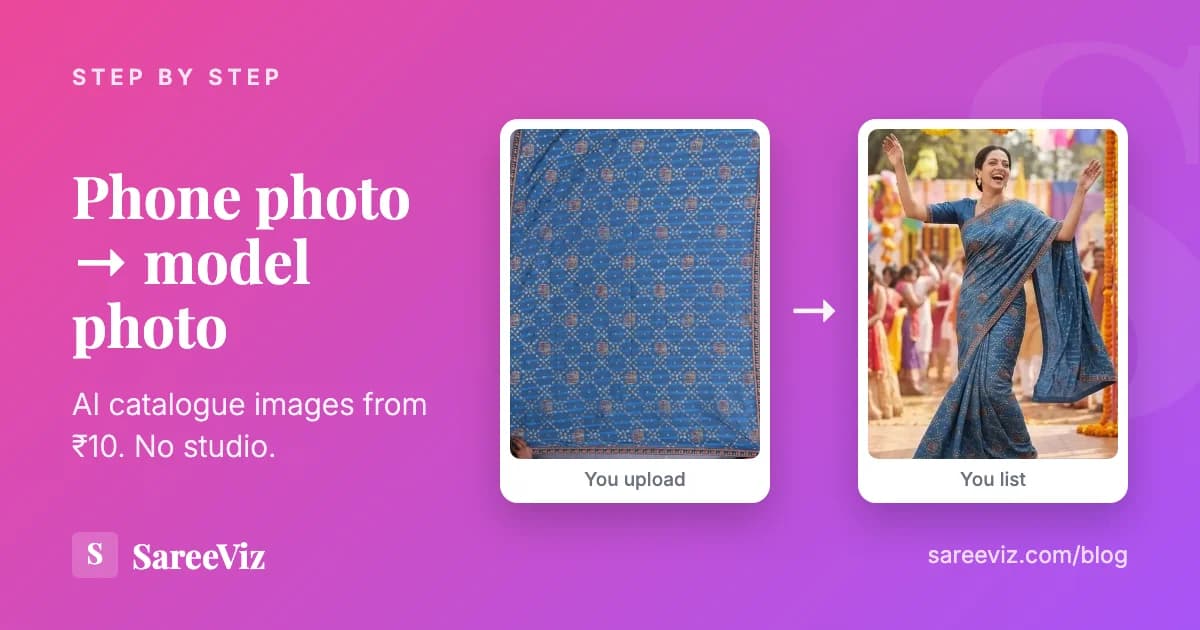
Result of a complete AI model photo workflow: a flat-lay saree in, a catalogue image out, in under 1 minute.
What you'll need before you start
A smartphone camera
12MP or above. No DSLR needed, because a modern phone is enough.
Good lighting
A window with natural daylight is ideal. Avoid harsh direct sunlight.
A steamed garment
Iron or steam your saree, lehenga, or garment before photographing.
You also need a SareeViz account with credits, and there is no subscription to sign up for. Add credits via Razorpay, priced by resolution: ₹10 at 1K, ₹15 at 2K, ₹20 at 4K, ₹25 at 8K, plus 18% GST. Credits expire 90 days from the date of purchase; see the Terms. If the first thing you are photographing is a saree, the saree guide covers the blouse upload before you spend a credit.
Working with a specific category? AI saree photography takes ethnic wear end to end, saree draping software covers drape styles, and AI jewellery photography covers metal and stones. This guide uses SareeViz for the walkthrough; if you want to see what else is out there first, our ranking of AI fashion model generators compares seven tools, and the ecommerce photography page shows the finished output.
Phase 1: Shoot your garment photo
This is the most important step. The AI output quality is directly determined by your input photo quality, so it is worth a few minutes to prepare your design photo before you shoot.
For sarees and flat garments
For lehengas and structured garments
Phase 2: Generate your AI model image
Pick your garment type
Sign in at sareeviz.com. Under Generate For on the dashboard, pick what you are shooting: saree, lehenga, salwar suit, kurti, dress, jewelry or one of the others. This choice decides which upload slots you get, so it comes before the photo.
Upload the design photo
Add one photo of the full garment in the design slot, for a saree that is Saree Design. This photo sets the fabric, the colours and the border in every output, so use your original product photo and never an earlier AI result. Crop it tight to the fabric, or tap Edit on the uploaded photo to crop inside the app. Any image file works, up to 20MB. The photo prep guide shows what an uncropped photo does to the result.
Add a photo per part that has its own design
If the blouse piece, the pallu or the border carries a design the main photo does not show, open Add Blouse / Dupatta Design or Add Close-Up / Lace / Pallu Design and give that part its own slot. One part per photo, cropped to just that part: a blouse photo that also shows the saree mixes the two designs. Most sarees need none of these or one. The saree guide works through each slot.
Check the draping preview (sarees)
Upload a saree and the Accurate Draping Preview appears, with Provide AI Draping Assistance ticked. Leave it on. It tells the AI which part of your photo belongs on the pallu, the pleats and the border. It is a guide for the AI, not a preview of your final image, so judge it on whether the right design is on the right section. If a design sits on the wrong side, tap Rotate.
Set model, background and pose (all optional)
Skip all three and the AI picks a model and a clean studio background. To take control, choose a Model prompt or upload a Model Image, which fixes the face and look; reuse the same Model Image across runs and your whole catalogue features the same model. Background prompt or a Background Image of your own shop sets the scene. Under Pose prompt(s) you can tick up to 10 poses and get one photo per pose in a single run, or upload Pose Image(s) to copy an exact body position. The pose guide shows every pose on the same outfit, and the model, background and pose guide covers all three controls.
Choose size, quality and format
Under AI Instructions, Aspect Ratio sets the shape, portrait for a WhatsApp status and square for Instagram, and Resolution sets the sharpness you pay for. Output format is PNG or JPEG. The defaults suit most catalogues.
Generate
The Generate button shows the resolution and the credit cost before you tap it, so there is no surprise on the bill. Photos come back in under 1 minute. Queue the next garment while you wait.
Review, then download
Check the garment colour and texture against your original, the way the fabric falls, and whether any part design has landed where it should. If something is off, the fixing a result guide names the usual cause. Download in JPEG for marketplace uploads, or PNG if you plan to edit before listing.
Phase 3: Build a batch workflow for large catalogs
Once you've verified that the process produces good output for your garment types, scale it up. Here's how to efficiently photograph a 50 to 200 item catalog:
Set a single shooting session
Designate one day each week to photograph all new or unshotgarments. Batch your shooting rather than doing one-at-a-time as new stock arrives.
Use a consistent shooting setup
Fix your phone height, surface colour, and lighting setup. Consistent inputs produce consistent outputs, so your catalog will look uniform across all images.
Queue uploads while shooting
Upload the photos you've already taken to SareeViz while continuing to photograph remaining garments. The AI processes in parallel, so by the time you finish shooting the early images may already be ready.
Keep one Model Image on hand
Upload the same Model Image on every run instead of picking a Model prompt each time. That is what keeps one face across the whole catalogue, and it is one file you reuse rather than a choice you remake per garment.
Organise downloads by product code
Download each image and name it with the product code (the SKU field on Meesho and Amazon) before moving to the next. This saves real time during marketplace upload.
Listing on Amazon? Images with AI-generated models now need a metadata tag before upload, and Amazon's main image rules for clothing are strict. The Amazon product photography page covers both.
Common mistakes and how to avoid them
✖ Using a dark background for dark garments
→ Always use white or light grey surfaces. A dark saree on a dark background leaves the AI unable to accurately isolate the garment.
✖ Photographing wrinkled or unsteamed garments
→ Steam the garment before photographing. Wrinkles in the input become artefacts in the output, and no AI tool smooths them out reliably.
✖ Shooting at an angle instead of straight-on
→ For flat-lays, photograph from directly above at 90°. Angled shots create perspective distortion that AI has trouble correcting.
✖ Cropping the garment in the input photo
→ Capture the complete garment with some margin around it. If the input cuts off the pallu or hem, the output will too.
✖ Using different models across the same catalog
→ Pick one model and save it. Switching models mid-catalog creates inconsistency that looks unprofessional in your Meesho or Amazon storefront.
Time and cost comparison
| Task | Traditional (50 garments, 3 photos each) | AI with SareeViz |
|---|---|---|
| Studio booking | 1 to 2 weeks lead time | None required |
| Shooting day | 6 to 8 hours | 2 to 3 hours (input photos) |
| Editing/post-processing | 5 to 10 days | Under 2 min per image |
| Total calendar time | 2 to 4 weeks | Same day |
| Total cost | ₹22,500 to ₹37,500 | ₹4,500 |
| Cost per kept image | ₹150 to ₹250 | ₹30 |
The studio figures are the published rate cards in our product photography cost guide: ₹150 a photo with a model in Kolkata, and ₹750 a saree for three photos in Navi Mumbai. The AI column is 1K, with three attempts budgeted for every photo you keep, because sellers keep about one image in three.
Frequently asked questions
What type of garment photos work best as AI model generator input?
Flat-lays on a clean, light-coloured surface work best. Hanger shots are also effective. Existing ghost mannequin images or even old model photos can be used as input. The key is good lighting, no motion blur, and the full garment visible in the frame.
How do I maintain consistent model appearance across my whole catalog?
Upload a Model Image rather than picking a Model prompt, and use that same file on every run. The Model Image fixes the face, hairstyle and look, and it controls the person only: the clothing and background in it are ignored, so your garment always comes from your own design photo.
How long does it take to generate one AI model photo?
Generation takes under 1 minute per image. Preparing the input takes longer than the generation does, because steaming the garment, shooting a clean flat-lay and cropping it is the part with your hands in it. Ticking several poses in one run is faster than starting a run per pose.
Can I generate AI model photos for both sarees and jewelry in the same session?
Yes. SareeViz supports sarees, lehengas, kurtis, and jewelry on the same platform. You can mix garment types in one session without switching tools.
What file format should I download for marketplace listings?
Download as JPEG for most marketplace uploads, because Meesho, Amazon, Myntra and Flipkart all accept JPEG. If you need to edit the image further (add a watermark, adjust crop), download as PNG first, then convert to JPEG for the final listing upload.
Start Now
Generate your first model photo in 5 minutes
Upload a garment photo. Select a South Asian model. Download your image. ₹10 per image, no subscription.
Try SareeViz Free →